Chinese Steamed Buns (饅頭)

8 Sep

Ahh sorry! Did not mean to take a two month hiatus… Summer got really hectic, and all of a sudden it’s over.

Anyway, mantou! I’m a lover of all things carb-y, so my making mantou is well overdue. Most of the recipes I’ve found used yeast, which surprised me because mantou has always struck me as a much denser bread.

As you can see in the picture, the tops of mine cracked a bit after they cooled. Ignore the yellow tint–there was something funky with the lighting, methinks. I’m not quite sure why, but it wasn’t a big deal because all eight of these babies were consumed in a single meal. Between two people. In retrospect, that was probably not the best idea.


A mantou in all it’s delicious glory. I modified the recipe from Almost Bourdain by converting everything to volume measurements. For flour, I weighed out about a pound and took a fraction of it. Macguyvering for the win.

Homemade Pizza

13 Jul

Woo I’m back in Boston for the summer! After all the madness of finals and packing and moving and travelling, I finally landed back at MIT. And I wanted pizza. (So did Bobby.) So we made some.

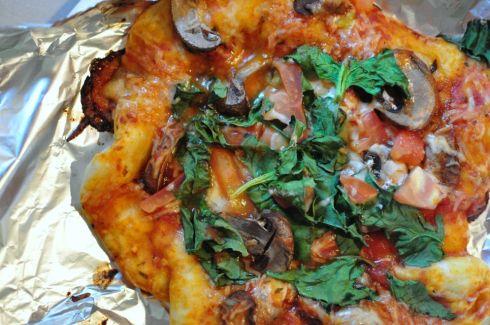
Pizza dough is actually incredibly easy to make, provided you have the right tools (i.e. a rolling pin…). I improvised, so my pizzas came out uneven and misshapen, but still crazy delicious. I used this recipe, and it made enough dough for two personal-sized pizzas.

Please remember to flour your working surface. This dough is insanely sticky and fairly unforgiving in terms of sticking to every. Freaking. Thing.

…including your baking surface. Especially if you lack corn meal and a baking stone like us, don’t forget to grease your aluminum foil! We put the pizzas on an upside down baking tin at 325 degrees for about 12 minutes, until the cheese started bubbling and the crust turned golden.

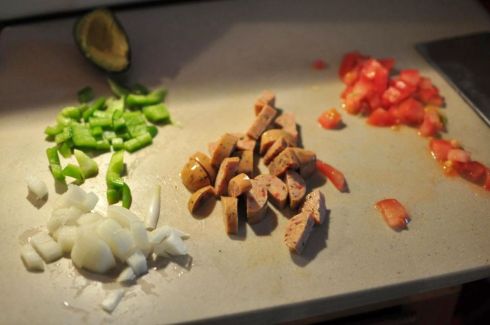
Bobby’s pizza had chicken sausage, peppers, onions, and tomatoes on them. He put some diced avocados (as much as ripe avocados can be diced…) on top before eating. Mine had spinach, mushrooms, and tomatoes. Nom nom nom!

Length of procrastination: 2 hours, including waiting time for your dough to rise.


Stale Cornbread is Delicious

21 Jun

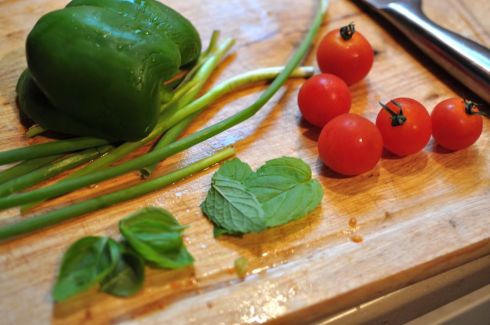
Another great recipe from Ezra Pound Cake. Her recent summer Meatless Mondays dishes are actually absolutely amazing. Also, I improvised a bit but it shows how basic and down to earth these recipes are. No need for fancy rare ingredients. I was even able to use some fresh produce from my herb garden…mint and basil, the first of the year. If only the cherry tomatoes I used were from my garden…last year my crop was a bit too bountiful and a lot went to waste.

The cornbread I made yesterday, partly because I went shopping for both of these meals, and partly because I wanted cornbread. After a day of aging (turning stale) they’ve become the right hardness to be cornbread croutons in this hearty summer salad…don’t worry, there’s not a single leaf of lettuce in it.

Cornbread Salad with Cherry Tomatoes, Black beans and Avocado

Ingredients
1 package Jiffy Cornbread mix
1 egg
1/3 cup milk

1/2 cup cherry tomatoes
1/2 green pepper
1/2 can black beans
1/2 avocado
1/4 cup green onion (1 stalk)

3 tbsp olive oil
1 tbsp red wine vinegar
4 leaves of basil
4 leaves of mint
salt and pepper

To make the cornbread, preferably a day in advance, mix the egg, milk and cornbread mix and spread into a loaf pan. Bake in an oven at 400 degrees for 20 minutes. Remove from the oven and leave sitting outside, uncovered, for a day.

Cut the cherry tomatoes into quarters. Dice the green pepper, and finely dice the green onion. Remove the avocado pit, and slice the avocado into squares right inside the shell before scooping out the chunks with a spoon. Mix all of this together with black beans and green onion in a large bowl.

In a medium bowl, pour the olive oil, red wine vinegar, and a pinch of salt and pepper. Chop the basil and mint leaves coarsely. Whip the olive oil and vinegar until it is smooth, and sprinkle in the mint and basil and mix a bit more.

Cut the cornbread into 1/2 inch cubes or crumble into large chunks. Toss however much cornbread you want into the large bowl with the veggies. Pour the dressing over the salad and toss until mixed. The cornbread croutons will be nice and toasty at the beginning, then will become soaked in dressing and flavor as you work through the salad. Which won’t take very long.

Total time procrastinated: 20 minutes
Ways to prolong procrastination: Don’t eat it so fucking fast

Meatless Mondays via Ezra Pound Cake

20 Jun

For this meatless monday I was quite uninspired until Christine sent me a link to Ezra Pound Cake’s Meatless Mondays posts. I was really impressed by how summery the food sounded – light and cool and tasty at the same time. I went to my new favorite grocery store, Market Basket, and bought a few ingredients that would cover both the pasta with zucchini and tomatoes, and the cornbread salad. Turns out the ingredients were fairly simple and nothing was unfamiliar to me except for greek yogurt. You could almost take these ingredients and turn them into a large variety of summer dishes. But the first one I made would end up being the noodles.

Buckwheat Noodles with Zucchini, Tomato and Lemon Yogurt Sauce

Ingredients:

2 packets of buckwheat noodles (or whole wheat spaghetti or linguini)
1/2 pint cherry tomatoes
2 medium zucchini or yellow squash
1 6 oz greek yogurt
2-3 oz Parmesan cheese
Salt and Pepper
Lemon zest or lemon pepper seasoning
1 clove garlic
Olive oil

Heat a pot of water to boil the noodles. Halve or quarter the cherry tomatoes. Peel the zucchini, then slice them into long thin slices, described best as “long pieces of gum”. When the water is boiling, toss the noodles in to cook. If you have a steamer, you can also steam the zucchini a little bit over the noodles. I cooked the noodles about 10 minutes, and it turns out that if you steam the zucchini for the whole time they will become overcooked.

Remove the zucchini from being steamed before they lose their crispness, after 3-5 minutes of steaming. Remove the noodles from the heat when they are cooked to the desired softness.

Heat olive oil in a large pan or wok. Toss in garlic, diced or thinly sliced. Toss the zucchini in, and stir fry in the oil. This should be enough to get them soft and slightly brown. Toss in the cherry tomatoes and briefly stir so that they become slightly soft and heated.

In a large bowl, mix the greek yogurt, plus about half that volume of parmesan cheese, a sprinkle of salt and pepper, and lemon zest. If you don’t have lemon zest, using lemon pepper seasoning works magically as well. Mix in the zucchini and tomatoes, then toss in the noodles. Toss everything, then top with some more Parmesan cheese and black pepper.


Total time procrastinated:20 minutes
Ways to prolong procrastination:Make cornbread croutons to top the noodles. See next post.

Bachelor’s Sous Vide Steak

20 Jun

A friend of mine forwarded me some articles on how to make the perfect steak out of a less expensive cut of meat…using an even less expensive version of a nouveau cuisine favorite technique. The meat is steak, and the art is cooking it sous vide. From Serious Eats is the recipe i followed for Beer cooler sous vide steak which something every bachelor should feel excited about. The advantage to cooking it sous vide, or in a hot water bath, is that the temperature supposedly never goes above what you’ve set, so the steak will be thoroughly rare, medium rare, or however you like it, and it will stay that temperature until ready for a quick sear in the pan. And fortunately for most of us, we all have a cooler which is just as good at keeping heat in as keeping it out. So using a beer cooler, hot water, and a cheap cut of meat inside a ziplock bag, we can enjoy steak as tender as they make in the restaurants.

I am still experimenting with cuts of meat. Supposedly the more expensive cuts are costly because they are easier to cook whereas the middle priced meats taste just as good, provided you don’t overcook them. In the end, I decided that bottom round is still not good enough for steak. Time to venture into the $7 to $10 range, though it’s still way more affordable than your $30 restaurant steak. (An actual grilled steak I had recently was a slab of dry aged ribeye or ny strip, which was genuinely good, and will be a meterstick for future steaks.)

Steak Sous Vide with Corn off the cob and Mediterranean Mix

Ingredients
8 or 10 oz cut of beef
Rosemary, thyme, oregano, parsley, or other aromatic herbs
Ziplock bag
Water cooler
Teapot or water heater
Meat thermometer

Heat about half a gallon of water on the stove until it reaches 140 degrees F. I estimated the heat by taking the water off the stove before it boiled but after the water started bubbling. Pour the water into the cooler, and if needed, add cold water until it is around 140. Medium rare is 135 degrees, and with slight cooling effects the steak should be about medium rare to medium. I ended up with a starting temperature of 150 degrees.

Season steak with herbs inside the ziplock bag. Do not add other ingredients such as salt or butter. Remove all the air from the bag and seal the ziplock bag, submerge the whole steak underwater, and set a timer for three 15 minute intervals. After each 15 minute interval, check the temperature of the water, and add more hot water if needed to maintain about 135 degrees.
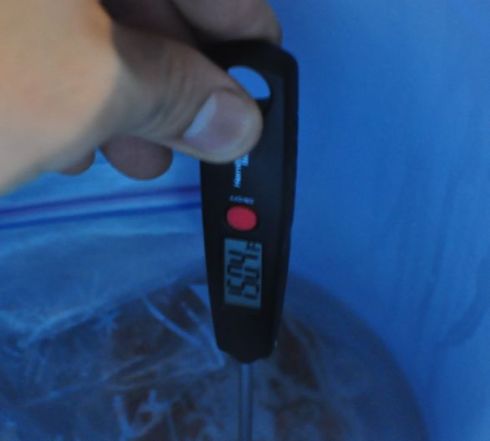
After 45 minutes, heat a skillet with oil. Remove the steak from the bag and sear quickly on both sides, getting a little char on each side but do not overcook. Also sprinkle sea salt and black pepper if desired.

For the corn off the cob, steamed a cob of corn over water for 10 minutes, then cut the kernels off with vertical slices of a knife.

The Mediterranean mix was a pack that came with various grains and seeds. Heat 1.5 cups of water with a tablespoon of butter. When the liquid boils, pour in the mix and stir on medium heat. Then let simmer until most of the water cooks away.

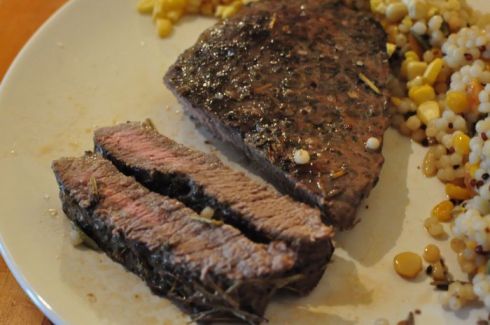
My steak ended up being a little overcooked still. That’s because I aimed for a temperature of 150 instead of 135, and every 15 minutes I added some hot water until it was between 145 and 150. The cooler I had seemed to leak heat a lot more than the Serious Eats article said. In the future I think it would be ok to start at 150 and just let the water sit for 45 minutes instead of raising the temperature back up twice.
Total time procrastinated: 60 minutes
Ways to prolong procrastination: Create a sauce with the juices left in the ziplock bag

Rosemary Sweet Potato Fries

6 Jun

I have several bottles of olive oil infusing with various herbs. They are all sitting on my kitchen counter, mostly unused. One contains a bunch of garlic that was starting to go bad (so the best way to store it of course, is to keep it in olive oil.) Another one is a container of oil with rosemary leaves, stored neatly in an old sake bottle. And for the past year or two it has been becoming more and more aromatic.

So naturally the best use of it was to use it all to fry up some sweet potato fries! Along with coarse sea salt, this was a snack worthy of a sunday afternoon, with a beer, sitting outside in my cushioned garden chair. Not sure if that’s what I did but it sure sounds appealing now.

Sweet Potato Fries with Rosemary and Sea Salt

Ingredients
One large sweet potato
1 cup olive oil infused with rosemary
Sea salt

Peel and cut the sweet potato into fries. Heat rosemary oil in a small sauce pan or pot, small enough so that you don’t need a ton of oil to create a layer for frying. Toss the sweet potato fries in the hot oil until they are tender and slightly brown. Remove the fries from the oil and drail oil back into the pan. Sprinkle liberally with coarse sea salt.

Total time of procrastination: 15 minutes

Birthday baking…for 42 people!

5 Jun

With only a few days left of classes, the two other class secretaries and I decided to bake for all the summer birthdays and some early fall birthdays in one fell swoop. Between June 1 and September 19, there were forty-two birthdays. Damn.

I made a chocolate cake with raspberry frosting and some chocolate chip cookies. I found the raspberry frosting here, and was intrigued because it used Cool Whip. Sadly, it didn’t spread well and I ended up with a pretty ugly cake. Or it might’ve been because I somehow lost my spatula and was frosting the cake with a butter knife. On a piece of aluminum foil. Well…you gotta use what you’ve got, right? At least it tasted pretty good.

In addition, I also baked chocolate chip cookies. These came out decidedly prettier, but they weren’t “chewy” like the recipe title promised. Don’t get me wrong…they were definitely tasty, but also definitely crunchy. It’s okay Alton Brown. I still love you.

I’d also like to say that I’m insanely jealous of all you food bloggers out there with tons of natural lighting in your kitchens. Mine has a big tree in front of the only tiny window, and my colors are always funky. Grr.

Oh, and here’s the spread of birthday goodness:

Alton Brown’s “The Chewy” Chocolate Chip Cookies
Converted into volume measurements from The Food Network 

2 sticks unsalted butter
2 1/4 cups bread flour
1 teaspoon kosher salt
1 teaspoon baking soda
1/4 cup sugar
1 1/4 cups brown sugar
1 egg
1 egg yolk
2 tablespoons milk
1 1/2 teaspoons vanilla extract
2 cups semisweet chocolate chips

Melt butter in a saucepan (I used a microwave…) and let cool. While you’re waiting, sift together the flour, salt, and baking soda and set aside.

In a stand mixer, combine the butter with both sugars using the paddle attachment. In a separate bowl, whisk together the egg, egg yolk, milk, and vanilla extract. Reduce the mixer speed and pour in the egg mixture. Mix until well-combined.

Add the dry ingredients into the wet in several batches, scraping down the sides of the bowl and the paddle each time. Add in the chocolate chips and mix. Cover and refrigerate for an hour.

Preheat oven to 375 degrees. Drop tablespoon-sized balls of dough onto a cookie sheet about 2 inches apart. Bake for about 12 minutes, until cookies are brown. Makes about 35 normal cookies and one mini one with no chocolate chips in it.

Length of procrastination: 1 hour 30 minutes

Crack Cookies

30 May

Bobby’s birthday was last week and although I’m still stuck in Davis cramming immunology, renal physiology, hematology, parasitology, and all sorts of other -ologies into my brain, I needed to send him something tasty. Enter crack cookies.

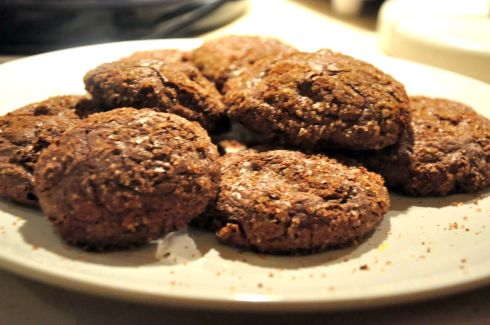
These things have another name (flourless deep dark chocolate cookies), but they’re so good that they taste like there’s crack in them (assuming crack tastes good…). They also crackle on top. Instead of rolling them in powdered sugar, I used raw sugar for an extra crunch. Plus, the melted sugar gives it a molasses-like flavor. Next time, though, I’ll probably use bittersweet chocolate chips instead of semisweet, as these cookies were a bit too sweet for me.

Of course, I also forgot to take pictures of them before I mailed them off, so these pictures are courtesy of Bobby. They’re individually wrapped for portion control purposes. :D

Crack Cookies
Adapted from Epicurious

Nonstick vegetable oil spray (or that awesome non-stick aluminum foil)
1 1/2 cups semisweet chocolate chips, divided
3 large egg whites, room temperature
2 cups powdered sugar
1/2 cup unsweetened cocoa powder
1 tablespoon cornstarch
1/4 teaspoon salt
1/2 cup raw sugar

Heat oven to 400 degrees and prepare two baking sheets.

Melt 1 cup chocolate chips in the microwave, stirring occasionally. Let cool while you make the meringue.

Beat egg whites to soft peaks. Gradually add in 1 cup powdered sugar and beat until the mixture resembles melted marshmallows, about 30 seconds. Whisk the remaining powdered sugar, cocoa powder, corn starch, and salt and gradually add into the meringue. Mix until combined. Add in the melted chocolate and remaining chocolate chips. The “dough” should be stiff, almost the texture of truffle chocolates. If it’s still too soft, try waiting a bit for the melted chocolate to cool a little more.

Roll dough into spheres and roll in raw sugar. Place on baking sheets about 2 inches apart–these cookies will spread! Bake for about 11 minutes, until the tops are cracked. Makes about 20 three-inch cookies.

Length of procrastination: 45 minutes

Herb and Cheese Beer Bread (Muffins)

25 May

Oooh, I love beer bread so much. Not only is it delicious, but it’s so easy to make. It takes less than 5 minutes to mix up all the ingredients and only about 12 minutes to bake. My roommates keep convenient 12oz bottles of beer in the house, so I’ll whip up a batch whenever I get a cheese craving.

Most beer bread recipes make loaves, but I’m more a fan of the muffin or scone-sized variety. I really like the crunch around the edges, especially the slightly burnt cheese topping. Plus, the it cuts the baking time waaay down. I get between 15-20 “muffins” out of this recipe, depending how full I fill each cup.

I’ve tried this recipe with a variety of beers, including stouts, light beers, and ciders. The more bitter beers make more bitter breads, obviously, but in some cases the flavor is a bit too much. On the other hand, the beer-y flavor is pretty much lost with ciders and Corona Light. I personally prefer a lighter flavor, but it’s definitely a personal choice.

Herb and Cheese Beer Bread

3 cups flour
1 tsp baking soda
1 tsp sugar
1 tbsp dried oregano
1 tbsp dried basil
1.5 tbsp garlic salt
1 cup shredded cheese, plus extra for sprinkling on top
12oz beer

Note: For the “herbs,” I tend to use whatever’s on hand. Basil, oregano, and garlic salt taste pretty good together, which is awesome ’cause it’s all I currently have in my cabinet. I tend to have a heavier hand in terms of seasoning, so adjust it to your taste.

Preheat oven to 350 degrees. Grease either a muffin tin or baking pan with baking spray and set aside.

Whisk together all the dry ingredients in a large bowl. Pour in beer and mix thoroughly with a fork.

Fill muffin tins about 80% full with batter or drop 3-inch dollops of batter onto the baking sheet. Top with some sprinkled cheese and bake for 12-15 minutes, until bread is golden brown.

Length of procrastination: ~20 minutes

Meatless Mondays

16 May

A few weeks back I decided to start doing Meatless Mondays, encouraged by several factors including the global warming crisis, a desire to explore more interesting vegetarian dishes, and a friend who was also doing it. However, the most compelling reason I started was that the Sunday before we had done some sort of barbeque and I had eaten so much meat that my stomach was upset at me for days. Hence, Meatless Mondays was started to counteract Shitless Sundays.

To be honest, eating is a much more interesting act now than before I started. It’s not like I’m doing salad and health food on Mondays. No, the food is actually quite filling, and in many cases involves a healthy dose of oil, cheese, and glutenous things. It’s just that I am able to break the monotony of the standard weekly fare – rice plus some sort of grilled meat, or rice plus stir fried onions and peppers. Mondays I look forward to experimenting with whatever strange, exotic, and green leafy things I bought on a whim on a previous Haymarket run. Some examples include eggplant and tofu stir fry, grilled muenster sandwich and tomato bisque soup, and daikon and baby bok choy stew. Maybe if I start doing reruns I will make posts of those on a future Monday.

This week I mixed my Asian and southern roots, and made a collard greens and daikon gumbo. Can you even call it a gumbo, even though i’m from the coastal south, not the gulf south? I don’t know, but it turned into a ricey, beany, spicy mix that has the consistency of gumbo. So here’s the recipe to a super creamy and rich asian/southern cuisine.

Collard greens and daikon gumbo with brown rice and black beans

Ingredients
1 bunch collard greens
1 onion
3/4 can black beans
1/2 large daikon
2 cups brown rice, cooked
red chili pepper flakes
1 can vegetable stock
3 cloves garlic

Heat oil in a wok, and add in chopped garlic. Wash collard greens and chop into small pieces (1-2 inch squares). Peel and roughly dice an onion. Add onion to the hot oil and cook until almost translucent, and then add all the collard greens. Stir fry collard greens and onions for about 5 minutes, adding in salt and a generous amount of red pepper flakes.Add in black beans, then add in the can of vegetable stock, plus a second can’s worth of water.

Peel and slice daikon, then cut slices into quarters. Slices can be thick and chunky. Add the daikon and the precooked brown rice into the wok, and make sure there is enough water to partially submerge the daikon. Put a lid on the wok and let it simmer for 20-30 minutes. Occasionally stir the daikon and rice into the liquid so that it will cook thoroughly. I used brown rice that was still slightly crunchy, so by the time the vegetables were ready the rice was essentially recooked.

The dish is ready when the daikon is thoroughly soft, and the stalks of the collard greens are tender.

time to procrastinate: 45 minutes
ways to put off studying for finals more: make corn bread and sweet tea